An Honest Review of Vision Therapy at Home
/This is a review for a product that I received free of charge. However, I reached out to this company and asked for the opportunity to try this service in exchange for two completely honest reviews. You know I’m not going to lie, so here’s the honest assessment of VisionTherapyatHome.com. An important note is that when I found the program, the fee was one lump sum for a year of access. They’ve recently updated the pricing to include a sign-up fee then a flat monthly fee for as long as you use the program. I think having a monthly fee associated with the program helps add a note of “urgency” to complete the program, and it lowers the cost of entry to the program as well.
Recognizing that your child is struggling to learn to read can be one of the worst trials in a parent’s homeschool career. After all, we chose home education to give our child the best. So, it can be stressful and overwhelming to find ourselves in a situation where we feel as if *we* may be responsible for their learning struggles.

I’ve been in this exact situation before, when our younger daughter struggled to learn to read over a decade ago, and I know the doubts and fears you may be facing. After nearly two years of tears, fights, and guilt, she was diagnosed as “profoundly dyslexic.” You can read some of her journey here.
In that journey, we had important testing done, and we found that she struggled with several sensory processing issues - especially related to vision (none of which was her fault or my fault, which was very emotionally freeing for both of us).
Vision therapy was recommended by her developmental optometrist, and we launched into it right away. We maintained it for quite some time and saw significant gains… however, over time, the weekly trips and financial strain became too much for our family. We switched to violin lessons and saw continued progress through the cross-body motion and eye movements associated with practicing, though not nearly as profound as with vision therapy itself.
Fast forward almost a decade and my daughter’s copy-and-paste younger brother is having the same exact struggles. The blessing is that I’ve completely “been there, done that” and knew just where to go. I went back to the developmental optometrist that serves our area (Snider Therapy Center in Birmingham, AL). Unsurprisingly, our son’s diagnoses was very similar to our daughter’s, with a few of his own unique twists.
We knew he would need vision therapy. However, as a single income family who stays extraordinarily busy, we just couldn’t figure out how to make it work that we would take long trips to their office multiple times per month AND cover the cost of therapy.
Out of desperation, I googled “at home vision therapy.” I knew that the office visits were important, but they mostly served to track progress and move us to the next level. We had to complete therapy at home daily, regardless of whether we also did in-office visits or not. I thought, “If someone would just show me what to do and outline a typical course of care, I think we could make this work ourselves.” I wondered if there was an option that avoided the travel and expense… and google didn’t fail me!
“I thought, ‘If someone would just show me what to do and outline a typical course of care, I think we could make this work ourselves.’”
I ran across a website that looked just like what I had in mind - Vision Therapy at Home. It looked very legit, but there were *NO* reviews on it (at that time). I couldn't find a blog anywhere online that reviewed them nor did their Facebook have more than one review.
I did some online-sleuthing and found that the online service was associated with a physical location in Minnesota - so I reached out to them directly. I told them I was very interested in their service, however I was also very wary. The lack of reviews online (and lack of a “trial lesson”) made me very hesitant to invest in it. While it was significantly cheaper than in-person therapy, it was still a large sum of money (especially when I couldn’t tell whether it was real or not).
After a few phone conversations and emails, they agreed to allow us one year of use in exchange for two blog posts. I went into this exchange hoping that if it ended up being a great program, others researching it might also find this (thorough) blog review and know it’s a REAL program (and that it works!).
So let’s dig into the meat of the program.
First, if you want to know what vision therapy is and how it works, I encourage you to read those details on their website. Additionally, you’ll find some really helpful videos about vision therapy’s overall benefit by searching “vision therapy” on YouTube as well. Digging into the “how” is beyond the scope of this blog post (and my finance degree ;).
How does this work?
1- After signing up at VisionTherapyatHome.com, you’ll receive emails from the company including a receipt and access to their therapy portal hosted on Kajabi.
2- Within a week or so of signing up, you’ll receive a materials box. This box includes a large binder and all the manipulatives you’ll need to complete the therapy as directed in the videos.

NOTE: You WILL need a printer. The binder is empty, and it’s the expectation that you print any instructions or tracking sheets that you want a physical copy of and place those into the binder. I’m not happy about this and feel that, for the price, all the pdfs in the online portal should also be printed and organized into the binder. However, overall the kit is super thorough and very organized by phase.
3- Once logged into the Kajabi portal, you’ll start with Phase 1 (pictured below). There is a “Get Started Here” section that simply tells you the basics of beginning.

After clicking on the phase 1 activities, you’ll see what I call the “magic grid” below. Oh… how a grid makes this homeschool mom so happy sometimes!

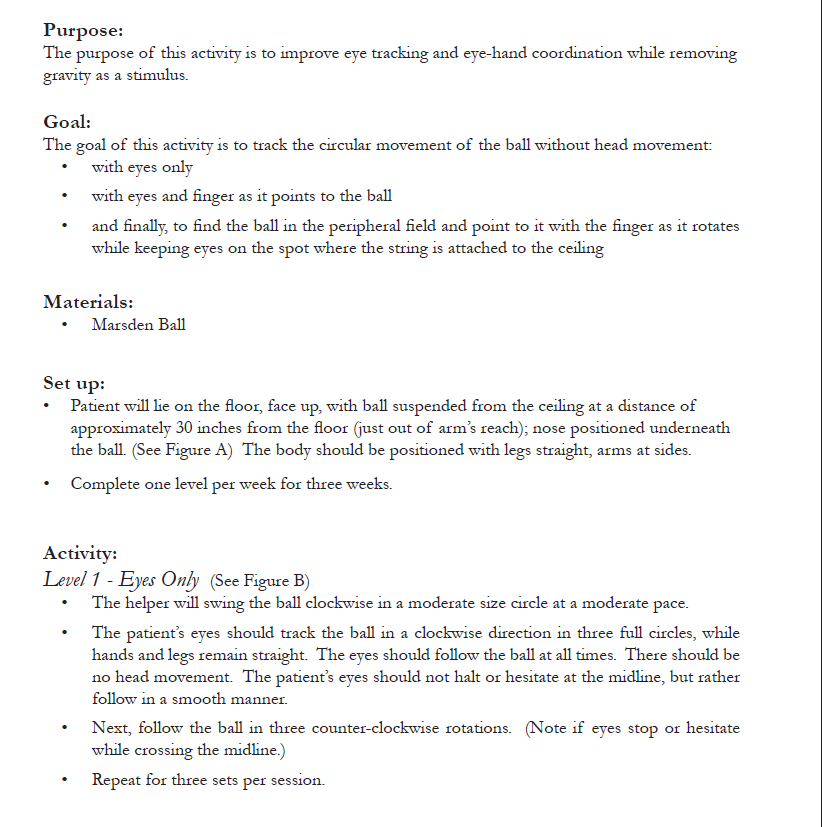
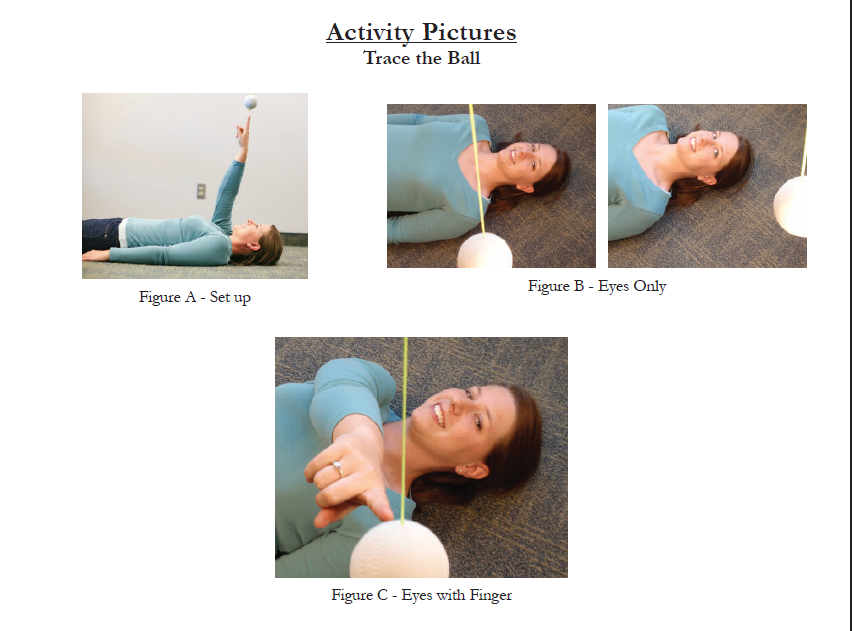
NOTE: Each phase includes 12 weeks of material (outlined in the helpful grid above) and has 4 “sections/columns.” There are exercises each week that cover gross motor, eye movement, Moro reflex, and focusing and eye movements. Each exercise also has different levels within it that your child will progress through. One exercise (for example: Trace the Ball) takes multiple weeks because you’ll do it to varying difficulties/levels before moving to another eye movement exercise.
SECOND NOTE: It is highly recommended that you do your therapy exercises 6-7 days per week. As a busy homeschool family, we tend to go for about 5 days a week and take weeks off incrementally. If *rapid* progress is important to you, don’t be like us. We’ve taken six months to get through phase 1 which should have taken 3 months, but we are also completely OK with that and haven’t seen much loss of gain with our lack of consistency.
4- For your first week, you’ll want to click on the blue, hyperlinked text in each column. This action will pop up a new window that has an EXCELLENT video (professionally done with great quality) as well as a PDF for instructions or any materials that should be printed available. You’ll also print off a tracker for each week. All printables are clearly visible below the video once logged in.

5- We found it helpful to watch the videos with our son, then demonstrate each new movement or technique with him. He usually catches on very quickly. As we move from day to day, it’s wonderful to see the movements or skills become smoother and more effortless for him.

There actually isn’t an exercise with the eye patch and pointing like this… he was modeling for me ;). I didnt’t want to photograph him during actual therapy as that could make him feel pressured to perform a certain way.
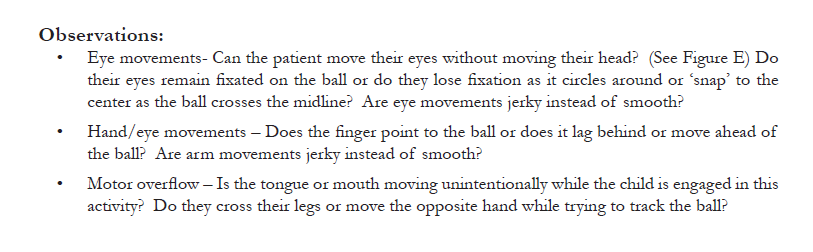
NOTE: Under each video, there is a pdf of instructions to print out. I’ve included a few images of it below. I love that it includes the purpose and goals of each activity as well as set-up. The pdf breaks each activity into levels that you’ll progress through before having mastered that particular skill. I also love that it tells you what to observe. If you’re new to VT, you might be overwhelmed at the idea of knowing how to even notate their progress or what to watch for. Each activity includes these questions to make note of and they include a sample tracking sheet with your kit as well, so you can see the kinds of notes made.

6- Then, just keep repeating each day and week. Continue with each skill in each column until mastered, tracking your progress and making notes so that you can also see the progress. Move through the program at your own pace.
Even with the lack of consistency I noted above, our son has made GREAT gains in his reading, eye movement, and fluency in the last 6 months. Had we been more consistent, I have no doubt he would be further ahead than he is now, but after almost 12 years of homeschooling, we recognize that the pace of the progress just doesn’t matter that much ;).
Overall, I recommend this program without hesitation. The staff and support are amazing, the execution and organization of the program is spot-on (except needing to print at home!), and as long as you put in the simple 10-15 minutes per day, you’ll begin to see amazing growth in your child’s reading abilities (assuming they’ve been recommended to do vision therapy!).
In about 6 months, I will follow up with an “end of program” review. Stay tuned!